Table of Contents
- Master the Art of Creating Presentation in PowerPoint
- PowerPoint Basics: Navigating Through Command Center
- 7 Essential PowerPoint Features to Design Like a Pro
- Level Up: Advanced Tools for Modern Presenters
- What are PowerPoint templates & Why You Should Use Them
- Best PowerPoint Templates to Checkout (WinSlides Edition)
- How to Create a Winning PowerPoint Presentation: Strategy Beyond the Slides
- Final Words: Master the Tool, Master the Room
How to Use PowerPoint: Beginner Guide to Create a Presentation in PowerPoint

Master the Art of Creating Presentation in PowerPoint
It is installed on nearly every business computer in the world. It powers boardroom pitches, classroom lectures, and TED Talks alike. Yet, for most users, Microsoft PowerPoint remains a tool they tolerate rather than master. We open it, type some bullet points, add a generic chart, and hope for the best. The reality is that most professionals only utilize about 10% of what this powerhouse software can actually do.
So What is PowerPoint really?
At its core, PowerPoint is not just a slide-making program; it is a comprehensive visual communication tool designed to turn complex ideas into persuasive narratives. Whether used for high-stakes business strategies, educational modules, or creative storytelling, it serves as the bridge between your raw data and your audience’s understanding. It transforms static information into a dynamic experience.
In this ultimate guide, we are going to move beyond the basics. We will walk you through the entire ecosystem—from navigating the essential ribbon menus to mastering advanced features like how to use Co pilot in PowerPoint to automate your workflow. You will learn not just how to build a slide, but how to design a story. By the end of this post, you won’t just know how to click the buttons—you will know how to command the room.
PowerPoint Basics: Navigating Through Command Center

Before you can build a masterpiece, you need to know where your tools are. The PowerPoint interface is designed around the “Ribbon”—the strip of buttons across the top of the window. Think of this as your command center. While it can look overwhelming at first, you really only need to master three key tabs to handle 90% of your daily work.
The Home Tab: Your Dashboard
This is where you will spend most of your time. The Home Tab is your default view and acts as your primary dashboard for assembling the structure of your presentation.
- New Slides: Click the “New Slide” dropdown to instantly add a fresh canvas. You can choose from standard layouts like “Title and Content” or “Two Content” to guide your placement.
- Font & Paragraph: Just like in Microsoft Word, this section lets you control the typography. Use it to adjust font size, bold key phrases, and organize your text into clean, readable bullet points.
- Drawing Tools: Need a quick box or arrow? The Home tab gives you immediate access to basic shapes without needing to switch menus.
The Insert Tab: Visuals & Media
If the Home tab is about structure, the Insert Tab is about content. This is where you bring your slides to life with elements that go beyond text.
- Pictures & Screenshots: Easily upload images from your device or grab a screenshot of an open window directly into your slide.
- Shapes & Icons: Access a massive library of vector icons and geometric shapes to build diagrams or highlight key points visually.
- Charts & SmartArt: Turn dry data into beautiful visuals. Use “Chart” for excel-based graphs and “SmartArt” to instantly convert a boring list into a professional flow or cycle diagram.
- Media: Embed videos and audio files directly onto the slide to create a multimedia experience that keeps the audience engaged.
The Design Tab: Instant Makeovers
The Design Tab controls the overall look and feel of your entire deck. It ensures consistency so you don’t have to manually format every single slide.
- Slide Size: This is critical. In the “Slide Size” menu, you can toggle between Standard (4:3), which is best for older projectors and iPads, and Widescreen (16:9), which is the modern standard for TVs and most laptops. Always check this before you start designing to avoid stretching your images later.
- Themes & Variants: Apply a pre-built “Theme” to give your presentation a uniform color palette and font style instantly. You can then use “Variants” to tweak the specific color combinations of that theme to match your brand.
The Draw Tab: Unleash Your Creativity
Ideal for touch-screen devices or digital pens, the Draw Tab lets you treat your slides like a whiteboard.
- Digital Ink: Use pens, pencils, and highlighters to annotate directly on your slides.
- Ink to Shape: Roughly sketch a circle or square, and PowerPoint will automatically snap it into a perfect geometric shape.
- Ink to Text: Convert your handwritten notes into typed text instantly.
The Transitions Tab: Moving Between Scenes
Transitions control how one slide changes into the next. This is where you set the pace and flow of your story.
- Subtle vs. Exciting: Choose from professional “Fade” and “Push” effects or more dynamic options like “Curtains” or “Morph.”
- Timing & Sound: Adjust exactly how long a transition takes (e.g., 0.5 seconds vs. 2 seconds) and add sound effects if needed (though usually best to avoid for professional decks).
- Advance Slide: Decide if the slide advances on a mouse click or automatically after a set time.
The Animations Tab: Bringing Objects to Life
While Transitions move the whole slide, the Animations Tab moves individual objects on the slide (like a bullet point flying in or a chart appearing).
- Entrance, Emphasis, Exit: Make text appear (“Fly In”), draw attention to it (“Pulse”), or make it disappear (“Fade Out”) when you are done talking about it.
- Animation Pane: This essential side-panel lets you reorder and time your animations so they happen exactly when you want them to.
The Slide Show Tab: The Delivery Suite
This tab is all about the performance. It prepares you for the moment you step on stage.
- Start Slide Show: Launch your presentation from the beginning or the current slide.
- Set Up Slide Show: Configure settings for a kiosk (looping continuously) or specific monitor setups.
- Rehearse Timings: Practice your speech while PowerPoint tracks exactly how long you spend on each slide, helping you refine your pacing.
The Record Tab: Video Production Studio
Modern PowerPoint is also a video creation tool. The Record Tab (sometimes found within “Insert” or “Slide Show” depending on your version) lets you turn your deck into a standalone video.
- Cameo: Insert a live camera feed of yourself directly onto the slide.
- Screen Recording: Record your computer screen to demonstrate software or processes.
- Export to Video: Save your entire presentation, including voiceover and timings, as an MP4 file to share on YouTube or LinkedIn.
The Review Tab: The Editor’s Desk
Before you hit “save,” use the Review Tab to polish your work.
- Check Accessibility: Ensure your slides are readable for people with disabilities (e.g., checking contrast and alt text).
- Translate: Instantly translate selected text into another language.
- Comments: If you are collaborating with a team, use this to leave notes and feedback on specific slides without altering the content.
The View Tab: The Blueprint
This tab changes how you see the PowerPoint, not how the audience sees it. It is crucial for organization.
- Slide Sorter: See thumbnails of all your slides at once to easily drag-and-drop them into a new order.
- Slide Master: This is the “God Mode” of PowerPoint. Changes made here (like adding a logo or changing a font) will universally apply to every slide in your deck instantly.
- Ruler & Guides: Turn on gridlines to align images and text boxes perfectly.
The Help Tab: Your Safety Net
- Contact Support: Direct access to Microsoft help.
- Show Training: Access built-in video tutorials for specific features if you get stuck.
7 Essential PowerPoint Features to Design Like a Pro
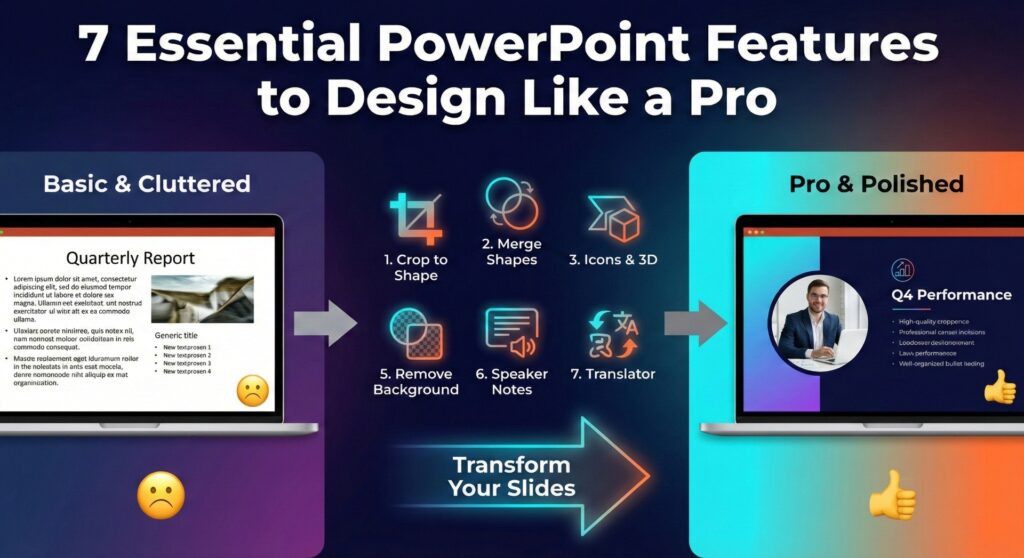
Knowing the menu tabs is step one. Step two is unlocking the hidden tools that turn a basic slide into a piece of design. You don’t need to be a graphic artist to create professional visuals; you just need to know these seven tricks.
1. How to Crop Images to Shapes
Stop sticking rectangular photos onto your slides. It looks copy-pasted. To make your images blend seamlessly into your design, crop them into circles, rounded rectangles, or creative shapes.
- Step 1: Select your image.
- Step 2: Go to the Picture Format tab.
- Step 3: Click the arrow under Crop and select Crop to Shape.
- Step 4: Choose your desired shape (e.g., Oval).
- Step 5: Use Aspect Ratio (under Crop) to select 1:1 if you want a perfect circle.
2. How to Merge Shapes
This is the “secret weapon” of PowerPoint designers. You can combine simple shapes to create custom icons, logos, or complex diagrams without leaving the software.
- Step 1: Insert two or more shapes (e.g., a circle and a square) and overlap them.
- Step 2: Select both shapes (hold Shift and click).
- Step 3: Go to the Shape Format tab.
- Step 4: Click Merge Shapes on the left side.
- Step 5: Choose your effect:
- Union: Fuses them into one single shape.
- Combine: Cuts out the overlapping part.
- Fragment: Breaks every overlapping piece into separate shapes.
- Intersect: Keeps only the overlapping part.
- Subtract: Uses the top shape to cut a hole in the bottom shape.
3. How to Insert Icons & 3D Models
Pixelated clip art kills credibility. Modern PowerPoint comes with a massive library of high-quality, scalable vector icons (SVGs) and 3D models that stay crisp at any size.
- Step 1: Go to the Insert tab.
- Step 2: Click Icons.
- Step 3: Browse categories or search for keywords (e.g., “Strategy,” “Rocket”).
- Step 4: Select your icon and click Insert. You can then change its color just like a text font.
4. How to Insert SmartArt
Bullet points are boring. SmartArt is the fastest way to turn a dull list of text into a professional flowchart, cycle, or hierarchy diagram.
- Step 1: Type your list of bullet points.
- Step 2: Select the text box.
- Step 3: On the Home tab, click Convert to SmartArt.
- Step 4: Hover over different options to see a live preview of your text transforming into a visual graphic.
5. How to Remove Background
You found the perfect picture, but it has a distracting white background. You don’t need Photoshop to fix it.
- Step 1: Select the image.
- Step 2: Go to Picture Format > Remove Background.
- Step 3: PowerPoint will automatically guess which part is the background (highlighted in purple).
- Step 4: Use Mark Areas to Keep (green pencil) or Mark Areas to Remove (red pencil) to refine the selection.
- Step 5: Click Keep Changes.
6. How to Add Speaker Notes
The biggest mistake amateurs make is putting their entire script on the slide. The slide is for the audience; the notes are for you.
- Step 1: Look at the bottom of the PowerPoint window.
- Step 2: Click the Notes button to open the panel at the bottom of the screen.
- Step 3: Type your script, reminders, or jokes here. These will be invisible to the audience when you use Presenter View, ensuring you never forget a point.
7. PowerPoint Translator
In a globalized world, accessibility is key. PowerPoint can translate your text instantly or even provide live subtitles in a different language while you speak.
- To Translate Text: Highlight the text > Right-click > Translate.
- For Live Subtitles: Go to the Slide Show tab > Check Always Use Subtitles > Subtitle Settings. Select your spoken language and the subtitle language. As you present, your words will appear translated in real-time at the bottom of the screen.
Level Up: Advanced Tools for Modern Presenters
You have mastered the basics and learned the design tricks. Now, it is time to upgrade your delivery. The difference between an amateur and a pro isn’t just the slides they build—it’s how they manage the room and leverage technology to work faster.
1. How to use Presenter View in PowerPoint
If there is one “secret weapon” for public speaking, this is it. Presenter View transforms your laptop screen into a private dashboard while the audience sees only your perfect slides. It eliminates the need for cue cards or memorizing a 30-minute script.
- Why use it: It gives you “X-Ray Vision.” You can see what slide is coming next, read your private notes, track your time, and even zoom in on details—all without the audience knowing.
- How to activate it:
- Go to the Slide Show tab on the ribbon.
- Check the box marked Use Presenter View.
- Connect your laptop to a projector or second monitor.
- Start your presentation. Your screen will change to the “Cockpit” view, while the external screen shows the “Audience” view.
- Pro Tip: Use the Laser Pointer tool inside Presenter View (click the pen icon) to highlight data on the big screen using your mouse, so you don’t have to turn your back to the audience to point at the wall.
2. The AI Revolution: How to use Co pilot in PowerPoint
The days of staring at a blank white slide are over. Microsoft’s Co-pilot is an AI-powered assistant integrated directly into PowerPoint (for Microsoft 365 subscribers) that acts as your personal designer and writer. It doesn’t just help you edit; it helps you create.
- What it does: Co-pilot uses large language models to generate entire presentations from scratch, summarize long decks, or redesign messy slides instantly.
- How to use it:
- Look for the Copilot button on the far right of the Home tab.
- Create from Word: If you have a business proposal or report in Word, open Copilot in PowerPoint and type: “Create a presentation from [File Name].docx.” It will read your document and build a 10-slide deck with images and bullet points in seconds.
- Redesign a Slide: Stuck with a boring list? Select the slide, open Copilot, and type: “Make this slide more visual” or “Add an image of a modern office.”
- Summarize: If a colleague sends you a massive 50-slide deck, ask Copilot: “Summarize this presentation in 3 bullet points.”
What are PowerPoint templates & Why You Should Use Them
If you are building every slide from scratch—drawing boxes, aligning text, and searching for hex codes—you are doing it wrong. This is the biggest productivity killer in the presentation world.
What are PowerPoint templates? Technically, a PowerPoint template is a pre-designed blueprint that dictates the layout, fonts, color schemes, and visual effects of your presentation. But practically, a good template is a shortcut to credibility.
The problem with the default templates built into PowerPoint (the ones everyone has seen a million times) is that they scream “Amateur.” To stand out in 2026, you need designs that look like they were built by a creative agency, not a weary manager at 11 PM.
This is where WinSlides changes the game. Instead of wrestling with alignment tools for hours, you download a professional framework, drop in your content, and you are ready to present. It turns a 4-hour task into a 15-minute one.
Best PowerPoint Templates to Checkout (WinSlides Edition)
To get you started, here are five essential templates from the WinSlides library that cover the most common business and creative needs:
Org Chart Template
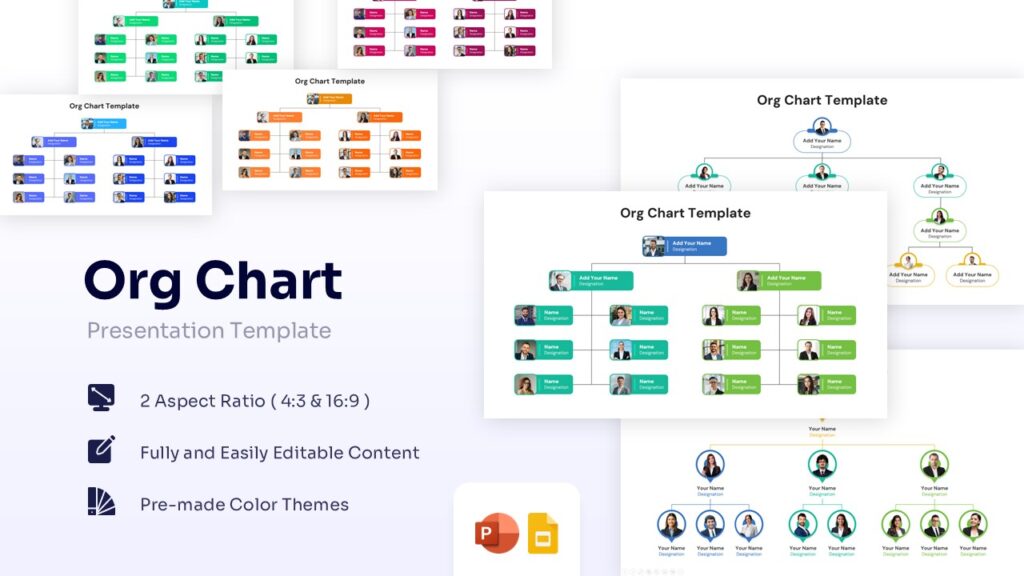
View: Org Chart Template
Best for: HR presentations and Team restructuring.
Why use it: Stop drawing manual lines that never line up. This template provides a clean, hierarchical visual of your team structure, making it easy to show reporting lines and department roles instantly.
30 60 90 Plan Template
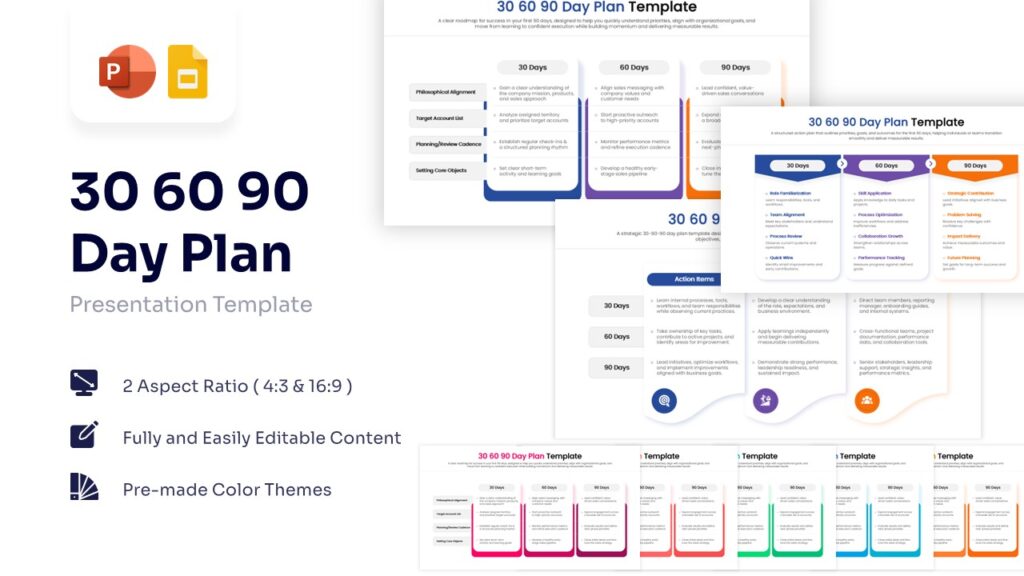
View: 30 60 90 Day Plan Template
Best for: Job Interviews and New Managers.
Why use it: If you are interviewing for a leadership role, this is your secret weapon. It visually maps out exactly what you will achieve in your first three months. Using a polished template here shows you are strategic and organized before you even get the job.
SWOT Analysis Table Template
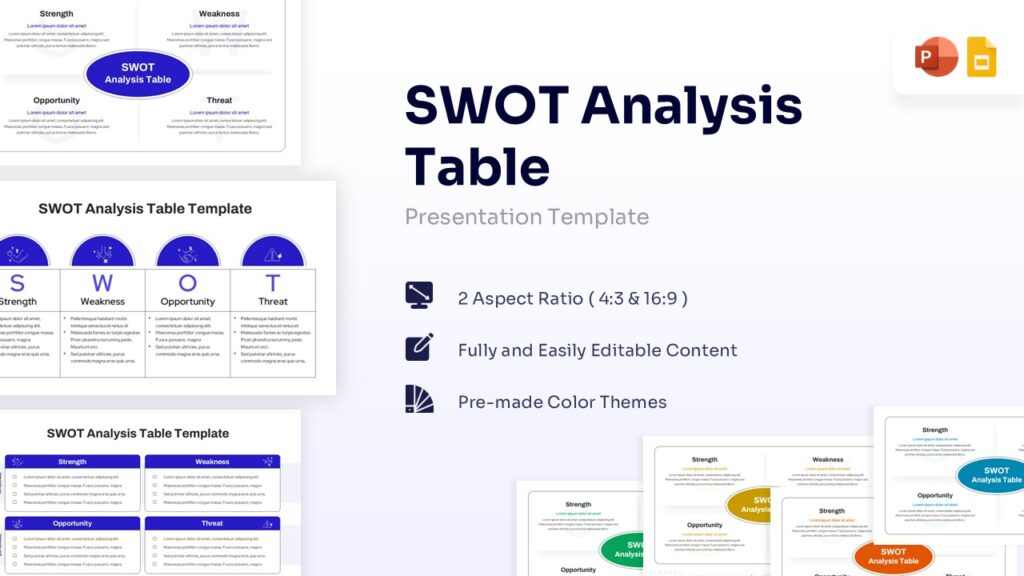
View: SWOT Analysis Table Template
Best for: Business Strategy and Quarterly Reviews.
Why use it: Every business needs to analyze Strengths, Weaknesses, Opportunities, and Threats. This template turns a boring list into a sleek, quadrant-style visual that makes your strategic insights pop off the screen.
Netflix Theme Pitch Deck
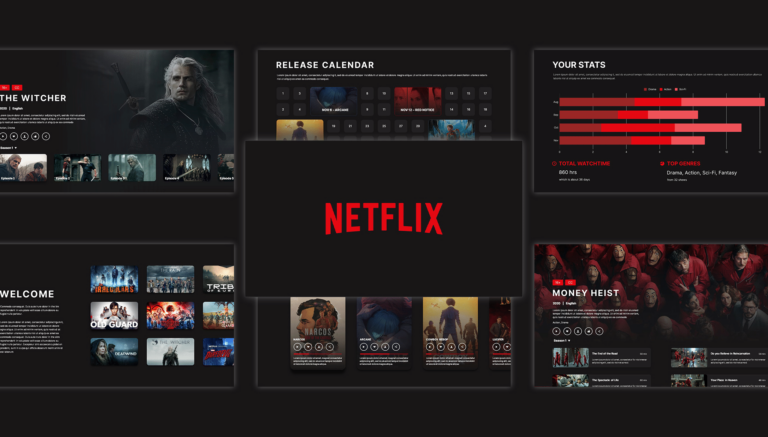
View: Netflix Theme Template
Best for: Investor Pitches and Media Proposals.
Why use it: Investors and clients are bored. Wake them up with a familiar, high-contrast dark mode aesthetic. This template mimics the UI of the world’s most popular streaming service to make your content feel “binge-worthy” and modern.
Spotify Theme Template

View: Spotify Theme Template
Best for: “Year in Review” and Data Storytelling.
Why use it: Everyone loves “Spotify Wrapped.” This template uses that same vibrant, data-heavy design style to present your annual metrics or marketing stats. It turns dry numbers into a colorful, engaging story.
How to Create a Winning PowerPoint Presentation: Strategy Beyond the Slides

You have mastered the buttons, the shortcuts, and the templates. Now, let’s talk about the strategy. A great PowerPoint isn’t just about pretty pictures; it’s about persuasion. To truly succeed, you need to think less like a designer and more like a director.
Here is the framework used by top executives and TED speakers to create a winning PowerPoint presentation every time.
1. The 10-20-30 Rule
Legendary venture capitalist Guy Kawasaki swears by this rule for a reason. It prevents “Death by PowerPoint.”
- 10 Slides: The optimal number of slides for a pitch. Humans cannot retain more than 10 concepts in a meeting.
- 20 Minutes: You should be able to give your presentation in 20 minutes. If you have an hour slot, the remaining 40 minutes should be for discussion.
- 30 Point Font: Never use a font smaller than 30 points. If you need smaller text, you are putting too much text on the slide. Force yourself to be concise.
2. Visual Hierarchy & “The Glance Test”
Your audience should understand the point of a slide within 3 seconds of looking at it. If they have to read a paragraph to get it, you have failed.
- One Idea Per Slide: Don’t cram three topics onto one page. Split them up. Slides are free.
- Use High-Quality Imagery: Replace bullet points with a single, powerful image that anchors the concept (remember the “Visual Anchor” technique?).
- Whitespace is Your Friend: Don’t fear empty space. It directs the eye to what matters.
3. Storytelling Structure (The Beginning, Middle, End)
Data doesn’t move people; stories do. Structure your presentation like a narrative arc.
- The Hook (Beginning): Start with a problem or a shocking stat. “We are losing $10k a day.
- The Journey (Middle): Show the struggle and the solution. “Here is why current methods fail, and here is our new approach.”
- The Call to Action (End): Tell them exactly what to do next. “Approve the budget by Friday.
Final Words: Master the Tool, Master the Room
PowerPoint is often blamed for boring meetings, but the tool is innocent. Used correctly, it is a canvas for leadership. Whether you are using Co-pilot to draft a strategy in seconds or leveraging Presenter View to deliver it flawlessly, the goal remains the same: to move your audience from confusion to clarity.
You now have the technical know-how and the strategic framework. The only thing missing is the design polish. Don’t let a blank white slide intimidate you.
Ready to transform your next presentation? Stop wasting hours on formatting. Download a professional WinSlides Template today—whether it’s a sleek SWOT Analysis or a bold Netflix Pitch Deck—and focus your energy on what matters most: your message.
Related Blogs
-

What is a Sales Presentation? The Ultimate Guide to Create Perfect Sales Presentation That Close Deals
How to Create a Sales Presentation – Improve your Sales Presentation Did you know that 41% of decision-makers admit to multitasking or losing focus during a sales pitch? In today’s competitive market, you have less than seven seconds to grab a prospect’s attention before they mentally check out. If your slides are cluttered or your…
-

7 Effective Presentation Techniques | Secret Presentation Skills, Tips and Techniques
How to Give a Killer Presentation? Secrets Revealed! Have you ever watched a world-class speaker and thought, “They were just born for the stage”? Most people believe that commanding a room is a rare personality trait—something you either have or you don’t. But here is the secret: Great presenters aren’t born; they are engineered. Behind…