Table of Contents
- Simple Methods to Draw on Google Slides
- Method 1: Using the Built-In Scribble Tool (Best for Quick Doodles)
- Method 2: Drawing During a Live Presentation (The Pen Tool)
- Method 3: Using Google Drawings for Complex Illustrations
- Method 4: Using the Annotate Chrome Extension
- Why Custom Drawings Elevate Your Google Slides Presentations
- Pro Tips to Format and Perfect Your Drawings
- The Smarter Way: Skip the Drawing and Use Winslides Templates
- Conclusion
- Frequently Asked Questions (FAQs)
How to Draw on Google Slides: The Ultimate Step-by-Step Guide
Simple Methods to Draw on Google Slides
Visuals can make or break a presentation. Sometimes, standard shapes just don’t cut it—you need to circle a crucial metric, draw a custom flowing arrow to guide the viewer’s eye, or sketch a quick idea freehand to make your point truly resonate.
If you have ever tried to do this, you might have hit a roadblock: you probably noticed that Google Slides does not have a dedicated, obvious “Draw” button anywhere on its main toolbar.
Fortunately, you don’t need to export your presentation or buy expensive design software. There are several easy, built-in tools and simple add-ons you can use to draw directly on your slides in seconds.
In this guide, we will walk you through four straightforward methods to draw your own shapes and annotations. But, if you are short on time and need your deck looking flawless for a meeting, you can always skip the hassle of drawing from scratch and simply drop your data into our professionally designed Diagram Templates.
Let’s dive into the steps.
Method 1: Using the Built-In Scribble Tool (Best for Quick Doodles)
If you are looking for the fastest native method for freehand drawing in Google Slides, the Scribble tool is your best bet. Because Google does not have a designated “Draw” button right on the main interface, the Scribble feature acts as a hidden standard pen tool. It is perfect for drawing custom lines, circling text, or adding quick doodles directly onto your canvas without leaving the presentation.
Here is how to use it:
- Step 1: Open your Google Slides presentation and select the exact slide you want to draw on.
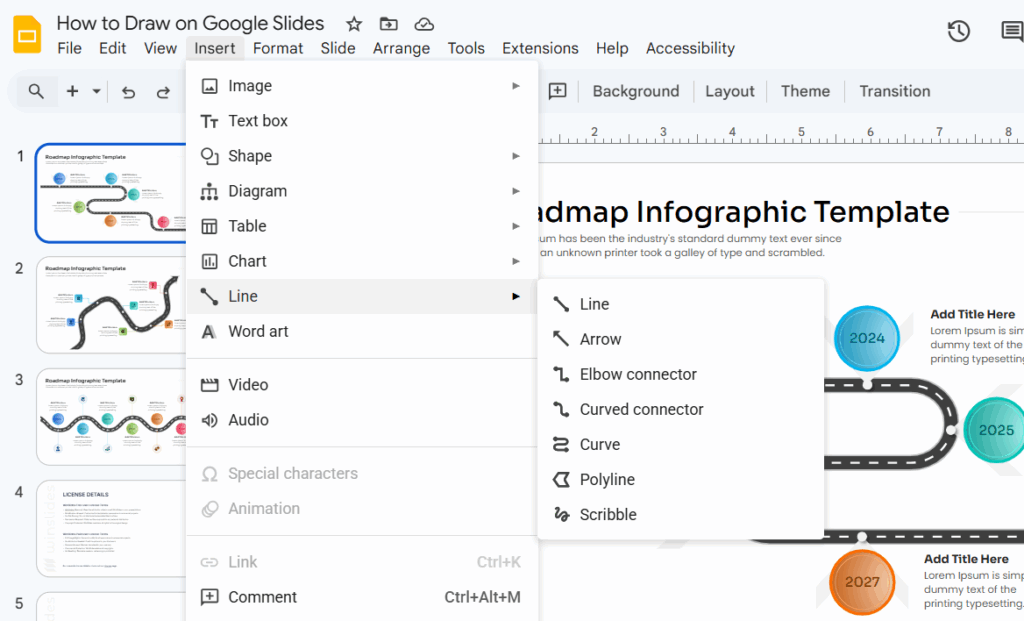
- Step 2: Navigate to the top menu bar, click on “Insert,” and hover over the “Line” option.
- Step 3: Select “Scribble” from the drop-down menu. You will notice your cursor instantly changes into a crosshair symbol, indicating the drawing tool is active.
- Step 4: Click and hold your left mouse button, then drag across the slide to draw your freehand shape or line. Simply release the button when you are finished.
(Pro Tip: Once your scribble is drawn, you can click on it to change the line color or thickness using the standard toolbar options at the top of the screen.)
Method 2: Drawing During a Live Presentation (The Pen Tool)
Sometimes you do not need a permanent drawing saved to your slide; you just need to emphasize a point while you are actively speaking. The hidden “Pen” tool is a fantastic feature for live meetings, pitches, or webinars when you need to annotate on the fly.
Here is how to unlock the live drawing feature:
- Step 1: Click the “Slideshow” button in the top-right corner of your screen to enter presentation mode.
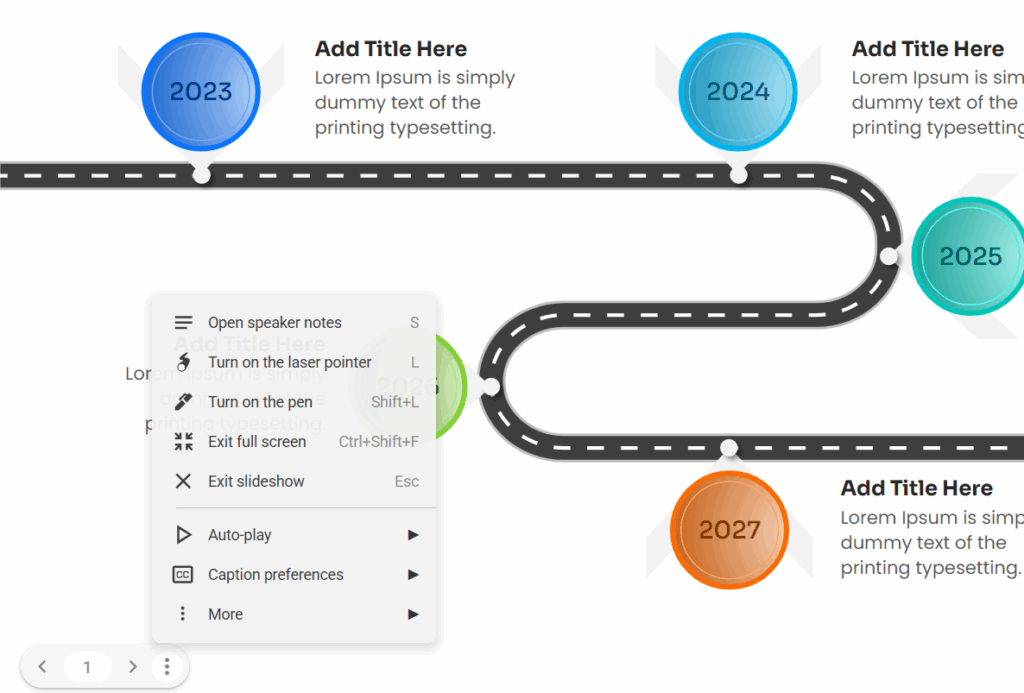
- Step 2: Move your cursor to the bottom-left corner of the screen to reveal the hidden presentation control bar.
- Step 3: Click the three dots menu (⋮) and select the “Turn on pen” tool. (You can also select the highlighter option if you prefer a thicker, translucent line).
- Step 4: Click and drag your mouse to underline text, draw arrows, or circle important data points while you speak to your audience.
(Pro Tip: To erase a mistake while presenting, just open that same three-dot menu and select the eraser tool, or press “Shift + E” on your keyboard to quickly clear all live annotations on the current slide.)
Method 3: Using Google Drawings for Complex Illustrations
While the Scribble and Pen tools are excellent for quick edits, they can quickly become frustrating if you need to build highly detailed diagrams or intricate shapes. For complex illustrations, using the dedicated Google Drawings workspace is much more efficient than trying to draw freehand directly on a small slide canvas.
Google Drawings gives you a much larger, dedicated area to build professional graphics that you can then seamlessly drop into your presentation.
Here is how to use Google Drawings with Slides:
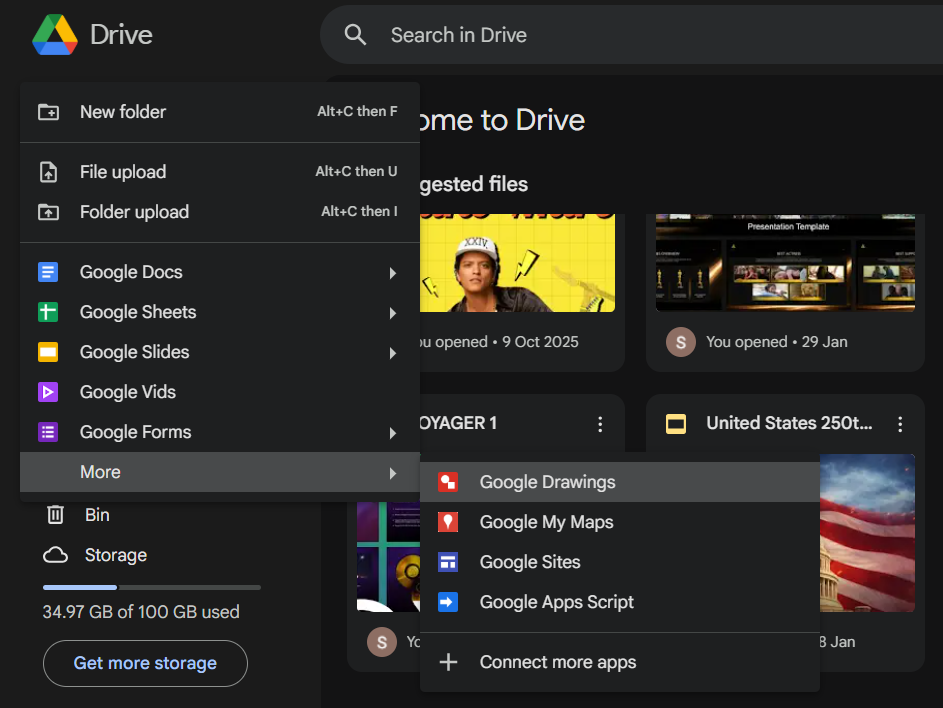
- Step 1: Open a new tab in your browser and go to your Google Drive. Click the “New” button in the top-left corner, hover over “More,” and choose “Google Drawings.”
- Step 2: Use the comprehensive drawing canvas to create your custom shapes, flowcharts, or icons. You have access to a wider variety of line tools, shape options, and better grid snapping to make your diagram perfect.
- Step 3: Once you are finished, go back to your Google Slides presentation. You can insert your new drawing by importing it directly from your Drive. Simply click “Insert” in the top menu, hover over “Image,” select “Drive,” and choose the file you just created.
(Pro Tip: Because Google products are linked, if you ever need to update that complex diagram, you can edit the original Google Drawing file, and it will give you an “Update” button right inside your Google Slides presentation!)
Method 4: Using the Annotate Chrome Extension
While Google’s built-in tools are great for basic needs, power users, professional presenters, and educators often prefer third-party extensions. These external tools offer much more control over pen weights, opacities, color palettes, and advanced drawing features that Google Slides simply lacks natively.
One of the most popular and effective options is using a browser extension like “Annotate” (or similar web-paint tools).
Here is how to set up an extension for drawing:
- Step 1: Go to the Chrome Web Store, search for the “Annotate” extension (or “Web Paint”), and click “Add to Chrome.” Once it is installed, make sure to pin the extension to your browser’s top toolbar for easy access.
- Step 2: Open your Google Slides presentation and click the new extension icon in your browser to activate its custom, floating toolbar right over your screen.
- Step 3: Select the Pen or Highlighter tool from the newly appeared menu and begin drawing directly over your slides. The best part about using a dedicated extension is that you can often save your annotations to your account, ensuring your hard work doesn’t disappear when you refresh the page.
(Pro Tip: Extensions work over the entire browser window, so you can use them not just on Google Slides, but also on live websites or PDFs during your presentations!)
Why Custom Drawings Elevate Your Google Slides Presentations
Most presentations suffer from the exact same problem: they are just walls of text and static bullet points. When you are presenting to a client, pitching to your boss, or teaching a team, relying solely on standard layouts is the fastest way to lose your audience’s attention.
Adding custom drawings, freehand circles, or live annotations completely changes the dynamic of your deck. Here is why taking the time to draw on your slides is worth the effort:
- It Directs Audience Attention: When you have a slide full of charts and data, your audience doesn’t know where to look first. A simple, hand-drawn red circle around your most important KPI immediately tells the viewer exactly what matters most.
- It Simplifies Complex Workflows: Sometimes, standard square shapes and rigid straight lines cannot accurately explain a fluid process. Drawing custom, curving arrows to connect ideas helps map out a workflow much more organically than a bulleted list ever could.
- It Boosts Live Engagement: If you use the Pen tool to underline text or draw checkmarks while you are speaking, it brings a sense of movement to an otherwise static screen. This “whiteboard effect” naturally draws the human eye and keeps your audience actively engaged with your pitch.
- It Adds a Human Touch: In a corporate world filled with rigid templates, a slightly imperfect, freehand doodle or custom sketch adds a layer of authenticity and personalization that makes your presentation memorable.
(Pro Tip: While custom drawings are great for engagement, they shouldn’t look messy. Always use contrasting colors—like a bright yellow or neon blue—so your drawings pop clearly against your slide background.)
Pro Tips to Format and Perfect Your Drawings
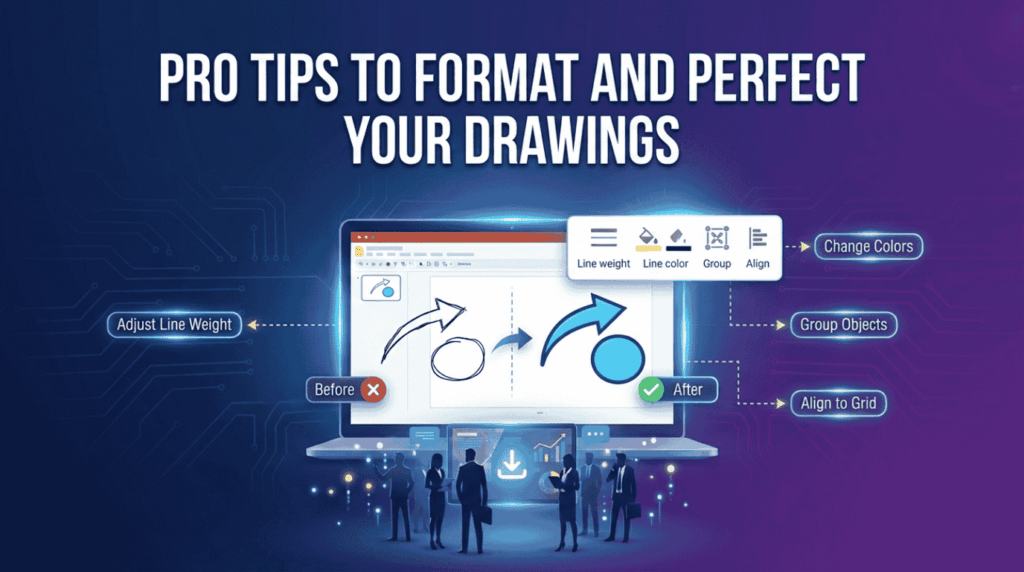
Once you have drawn your shapes or lines, you might want to clean them up so they look professional rather than messy. Here are a few quick formatting hacks to perfect your Google Slides drawings:
- Adjusting Colors & Line Weight: Don’t settle for the default thin black line. Click on your newly drawn scribble to highlight it. Then, look at the top toolbar—use the “Line color” (pencil icon) to make it pop with a bright color, and use the “Line weight” (stacked lines icon) to make it thicker and more visible. You can even use the “Line dash” icon to turn it into a dotted line.
- Grouping Objects: If you sketch a custom diagram that consists of five different freehand lines, you do not want to accidentally drag one piece out of place later. Click and drag your cursor over all the lines to highlight them together, right-click, and select “Group” (or press Ctrl+Alt+G / Cmd+Option+G). Now, your entire drawing will move and resize as one single, secure object.
- Layering for Depth: Did you draw a circle that accidentally covered up your important text? Right-click your drawing, hover over “Order,” and select “Send backward.” This ensures your annotations sit perfectly behind your text but above your background images.
The Smarter Way: Skip the Drawing and Use Winslides Templates
Let’s be honest: while drawing freehand circles and arrows is great for quick edits, building complex diagrams, process roadmaps, or flowcharts from scratch takes up a massive amount of your valuable time. As a professional, you need your slides to look polished, authoritative, and clean—not like a chaotic whiteboard.
Instead of fighting with the Scribble tool to piece together a perfect timeline, you can take the ultimate shortcut.
Skip the busywork and browse our extensive library of fully editable Professional Infographics Template Library. Our presentation experts have already done the heavy lifting and pixel-perfect formatting. All you need to do is download the deck, plug in your specific data, and present to your stakeholders with absolute confidence.
Conclusion
Drawing on Google Slides doesn’t have to be a frustrating experience just because there isn’t a massive “Draw” button sitting on the main dashboard. Whether you use the Scribble tool for a quick edit, Google Drawings for a detailed flowchart, or the live Pen tool to keep your audience engaged, you now have the exact skills you need to make your presentation visually dynamic.
But remember, your time is your most valuable asset. If you want stunning, complex visuals without the manual labor, download a Diagram Template today and get your presentation ready in minutes.
Frequently Asked Questions (FAQs)
Can you draw freehand on Google Slides? Yes. The easiest native method is to navigate to the top menu bar, click Insert > Line > Scribble. This immediately turns your cursor into a drawing tool, allowing you to click and drag to draw freehand shapes directly on your slide canvas.
Is there a pen tool in Google Slides? Yes, but it is primarily designed for live presentations, not standard editing. To access it, click the “Slideshow” button to present your deck. Then, hover your mouse over the bottom-left corner to reveal the control bar, click the three-dot menu, and select “Turn on pen” to annotate your slides while you are actively speaking.
Related Blogs
-
How to Write an Elevator Pitch: The Ultimate Step-by-Step Guide
Creative elevator pitch examples for every scenario The average human attention span is now reportedly less than that of a goldfish—about 8 seconds. In a world of endless distractions, like Instagram reels, YouTube shorts, you don’t have time for long introductions. You need to hook your audience immediately, whether you are in a networking meeting,…
-

What is a Sales Presentation? The Ultimate Guide to Create Perfect Sales Presentation That Close Deals
How to Create a Sales Presentation – Improve your Sales Presentation Did you know that 41% of decision-makers admit to multitasking or losing focus during a sales pitch? In today’s competitive market, you have less than seven seconds to grab a prospect’s attention before they mentally check out. If your slides are cluttered or your…